A Step-by-Step Guide: How to Change a Cricut Blade
If you're a creative enthusiast or a crafting aficionado, you've probably encountered Cricut machines. These cutting-edge devices enable you to transform your artistic visions into reality by cutting intricate designs and patterns on various materials. One essential part of the Cricut machine is the blade, which requires occasional replacement to ensure precise and clean cuts. In this comprehensive guide, we'll walk you through the step-by-step process of changing a Cricut blade, helping you maintain peak performance and efficiency for your crafting projects.
Understanding the Cricut Blade
Before delving into the replacement process, it's essential to grasp the fundamentals of the Cricut blade. The Cricut blade is the component responsible for cutting the materials placed on the cutting mat. It's essential to ensure the blade is sharp and in good condition to obtain crisp, accurate cuts.
Cricut offers various blades, each designed for specific materials and projects. Commonly used blades include the fine-point blade, deep-point blade, bonded fabric blade, rotary blade, and knife blade. Different materials may require specific blade types for optimal results. When it comes to replacing the blade, the process is relatively straightforward and doesn't require any advanced technical skills.
Step-by-Step Guide to Changing a Cricut Blade
Step 1: Prepare Your Workspace
Before you begin, create a clean and organized workspace. Ensure you have enough room to comfortably work with your Cricut machine. Gather the necessary tools, including the replacement blade, a Cricut scraper, and a soft lint-free cloth to clean the machine and blade housing.
Step 2: Turn Off and Unplug the Machine
Safety is paramount when working with any electronic device. Turn off your Cricut machine using the power button and unplug it from the power source. This precaution will prevent any accidental mishaps during the blade replacement process.
Step 3: Open the Clamp and Remove the Cutting Housing
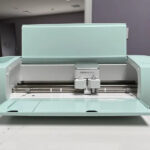
Locate the clamp that holds the cutting housing in place. Depending on your Cricut model, you may find a small lever or a locking mechanism. Release the clamp to open it and gently remove the cutting housing from the machine.
Step 4: Identify the Blade Cartridge
With the cutting housing in hand, locate the blade cartridge. This is the part that houses the blade and determines the cutting depth. The blade cartridge will have a protective cap covering the blade for safety reasons.
Step 5: Remove the Protective Cap
To access the blade, carefully remove the protective cap from the blade cartridge. Hold the cartridge securely and twist the cap counterclockwise until it comes off. Set the cap aside in a safe place to avoid misplacing it.
Step 6: Extract the Old Blade
Once the protective cap is removed, you can now see the old blade inside the cartridge. To take out the old blade, carefully grip it between your fingers and pull it straight out. Be cautious not to touch the sharp edge of the blade to prevent any injuries.
Step 7: Dispose of the Old Blade Safely
Since the old blade will be dull and no longer suitable for precise cuts, dispose of it safely. You can use the cap you set aside earlier to cover the old blade before discarding it. This ensures that no one accidentally comes into contact with the used blade.
Step 8: Insert the New Blade
Now that the old blade is removed, it's time to install the new one. Take the replacement blade and align it with the slot in the blade cartridge. Gently push the blade into the cartridge until it sits firmly in place. You should feel a slight click when the blade is correctly inserted.
Step 9: Replace the Protective Cap
Once the new blade is securely in the cartridge, it's time to replace the protective cap. Line up the cap with the cartridge and twist it clockwise until it locks into position. The cap ensures the blade remains safely covered when not in use.
Step 10: Reinsert the Cutting Housing
With the new blade installed and the protective cap in place, slide the cutting housing back into the appropriate slot on your Cricut machine. Make sure it fits snugly and securely in place.
Step 11: Secure the Clamp
Finally, close the clamp to secure the cutting housing in its place. Double-check to ensure it's firmly locked to prevent any issues during operation.
Testing the New Blade
Before you dive into your next project, it's a good idea to test the new blade to ensure everything is in working order. Load a test project onto your Cricut machine, select the appropriate settings for your material, and initiate the cutting process. Inspect the results to verify that the new blade is cutting accurately and cleanly.
Blade Maintenance and Lifespan
The lifespan of a Cricut blade depends on various factors, such as usage frequency and the types of materials you work with. Proper maintenance can extend the life of your blade and ensure optimal performance. Here are some maintenance tips:
- Clean the Blade Regularly: After each use, gently clean the blade and housing using a soft, lint-free cloth. This will prevent debris and residue from building up and interfering with future cuts.
- Use Correct Blade for the Material: Ensure you're using the appropriate blade type for the material you're cutting. Using the wrong blade can result in subpar cuts and potentially damage the blade.
- Replace Blades as Needed: Pay attention to the quality of cuts and replace the blade as soon as you notice any signs of dullness or inconsistency.
- Store Blades Properly: If you have spare blades, store them in a cool, dry place away from direct sunlight and moisture.
In Conclusion
Changing a Cricut blade is a straightforward process that requires minimal effort. By following this step-by-step guide, you can ensure your Cricut machine continues to deliver precise and flawless cuts for all your creative projects. Remember to prioritize safety, use the correct blade for each material, and maintain your blades regularly to enjoy the full potential of your Cricut machine for years to come. Happy crafting!
To find out more about Cricut, please visit any of the following areas:
- How to use cricut infusible ink
- How to make stickers with cricut
- How to make cricut mat sticky again
- How to iron on cricut vinyl
- How to download fonts to cricut
- How to make stencils with cricut
- How to use a cricut
- What is a cricut machine
- How to cut cardstock on cricut
- How to make cake toppers with cricut
- How to put vinyl on cricut mat
- Why is my cricut not cutting
- How to make shirts with cricut
- How to slice in cricut design space
- How to use svg files with cricut craft room
- Why does my cricut keep disconnecting
- How to load cricut mat
- How to curve text on cricut
- How to curve an image on cricut
- How to use cricut card mat
- How to make coasters with cricut
- Why is my cricut power button red
- Why won’t my cricut connect to my computer
- How to calibrate cricut
- How to make stickers with cricut joy
- How to mirror on cricut
- How to do multiple colors on cricut
- How long does a cricut blade last
- How to emboss with cricut
- How to save cricut design as pdf
- Cricut Hat Press: A Comprehensive Guide on Usage - August 13, 2023
- Unlocking Creativity with the Cricut Joy: A Comprehensive Guide - August 12, 2023
- The Ultimate Guide to the Cricut Maker Bundle - August 11, 2023


